Show Hue Motion Data on a Website
Maybe you have looked at your Hue Motion sensor and thought: “Can I do more with this?”. Well, you are not alone. I had the exact same thought and started to think about what could be a nice use case. As the Philips Hue motion sensor captures more than just the fact of whether it sees motion or not, I decided to do something with all the information.
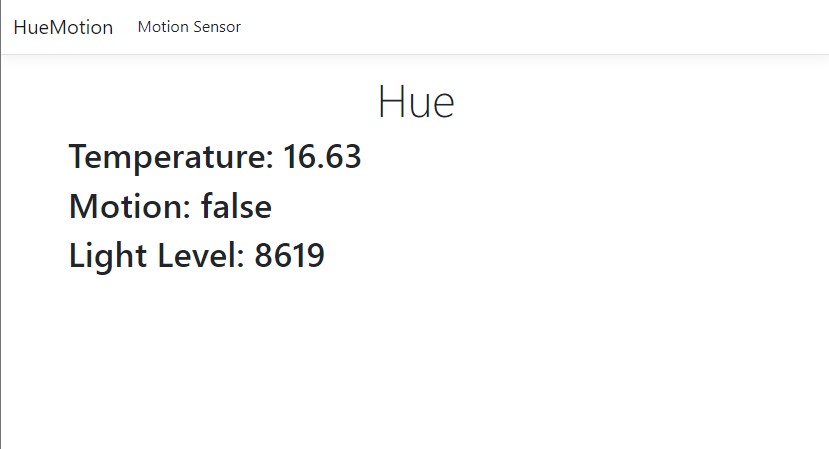
This is when I decided to create a website to place temperature, motion, and light level on. To accomplish I created a C# .NET 6 website which can be found on this GitHub page. If you rather see a different programming language, please leave a comment so I can try it in another language too.
1. Introduction
There are a couple of things we need to do before we can show our captured motion data on a website. First of all, we have to create a new C# web application. After creating the application it’s time to set up your local configuration. Then we should configure a HttpClient to talk to your local bridge and create the appropriate services to use this HttpClient. Lastly, we need to show our motion data on the web page.


2. Create the web application
If you don’t have any experience with this I would like to refer you to this tutorial, make sure you have Visual Studio installed. For this tutorial the basic web template fits perfectly. Create a new folder for your website, e.g. HueMotion and run the following command:
dotnet new webappThis will automatically create a basic new web app for you. You can also do this from within Visual Studio by selecting “Create a new project” after starting the application. To continue open the .csproj file which was created by the command or by Visual studio. Try and run the application, if this works you can go to the next step.
3. Alter the configuration
Within a C# application, you add the configuration to a settings file called the appsettings.json. To let this application work, we need to configure your local bridge IP and application key. If you don’t already have these, please follow this tutorial up until part 2. Now add the following part to your appsettings.json and replace the values with your own values.
{
  ///
  "HueApi": {
    "BridgeIp": "YOUR_BRIDGE_ID",
    "ApplicationKey": "YOUR_APPLICATION_KEY"
  },
  ///
}
4. Configure HttpClient and create the service
To keep the application as clean as possible we would like to implement a best practice of using a general HTTP client. For more information about this client HttpClientFactory please read this tutorial. While adding the HttpClient to the program.cs, we need to make sure we set up the correct BaseAddress (with the bridge IP) and DefaultRequestHeaders (with your application key). The BaseAddress now looks something like this: https://<your IP address>/clip/v2/resource which makes it easier to call the endpoints later.
builder.Services
    .AddHttpClient("HueApi", httpClient =>
    {
        httpClient.BaseAddress = new Uri($"https://{builder.Configuration.GetValue<string>("HueApi:BridgeIp")}/clip/v2/resource/");
        httpClient.DefaultRequestHeaders.Add("hue-application-key", builder.Configuration.GetValue<string>("HueApi:ApplicationKey"));
    })
    .ConfigurePrimaryHttpMessageHandler(x => new HttpClientHandler()
    {
        ServerCertificateCustomValidationCallback = delegate { return true; }
    });
As you can see, in this tutorial we don’t validate the certificate and directly return true. In the GitHub project, I use a CertificateValidator to validate the returning certificate from the bridge.
Now it’s time to add the HueApiService. In this service, I added 3 methods to receive the Temperature, motion, and light level data from your motion sensors. an example to fetch the motion data can be seen here:
    public async Task<RootMotion> GetMotionDataAsync()
    {
        var httpClient = _httpClientFactory.CreateClient("HueApi");

        var httpResponseMessage = await httpClient.GetAsync("motion");

        httpResponseMessage.EnsureSuccessStatusCode();

        var json = await httpResponseMessage.Content.ReadAsStringAsync();
        return JsonSerializer.Deserialize<RootMotion>(json);
    }
As you can see on the GitHub page, the method uses HttpClient to fetch data from the “/motion” endpoint. This is then converted to a C# model and returned to the controller. Now to use this service you will need to configure it within your program.cs as follows:
builder.Services.AddScoped<IHueApiService, HueApiService>();5. Create the web page
To show the captured data on a web page, I created a new HueController, which contains 3 methods. First we have the MotionSensor method which returns the actual view. Then we have the GetHueMotionSensorDetails method to refresh the data every 20 seconds. Lastly we have a method that returns a ViewModel with all the data. This data is fetched via the different methods in the service. Within the view we use this bit of jQuery to refresh the data every 20 seconds:
setInterval(refreshPhilipsHueData, 20000);

function refreshPhilipsHueData(){

    $.getJSON("/Hue/GetHueMotionSensorDetails", function( data ) {
        document.getElementById("temperature").innerHTML = data.temperature;
        document.getElementById("motion").innerHTML = data.motion;
        document.getElementById("light").innerHTML = data.lightLevel;
    });
}
That’s it, start your application and see it running in the browser! If it doesn’t work directly please download my github project and look for the differences.
REMINDER: Please replace the Bridge IP, and ApplicationKey from the appsettings.json
6. Conclusion
From within the Hue App you can do lot’s of cool things with the motion sensor. But this sensor captures more data then is shown from within the app. In this guide we created a website to extract all data points and show them on a simple web page. See this as a starting point and use your creativity to do the most with it. If you want me to write a guide about a different cool topic, please write it down in the comments.
Happy coding!
For other guides, please go to my guides page.


